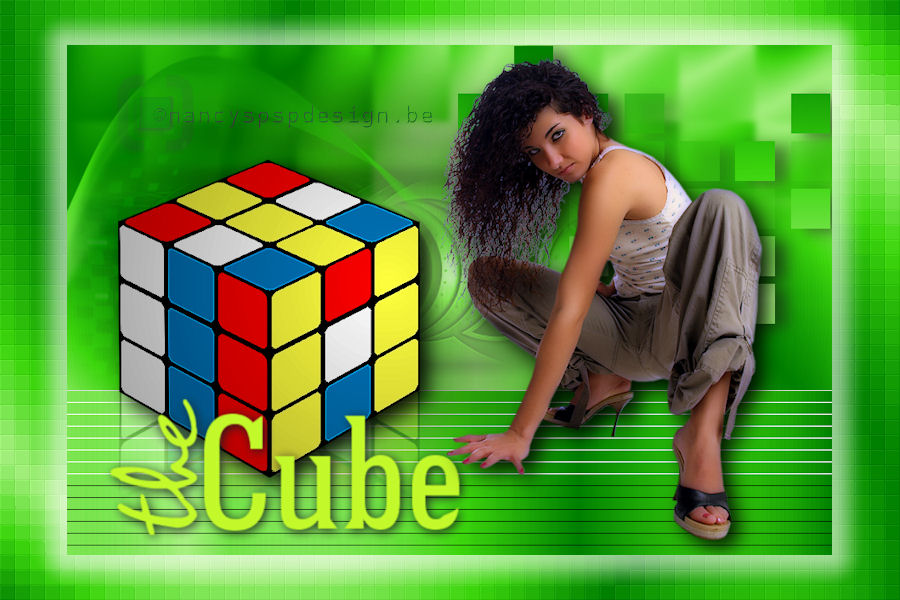
|
The Cube
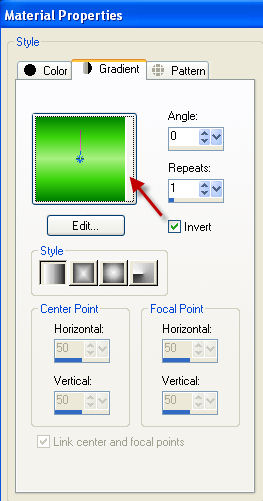
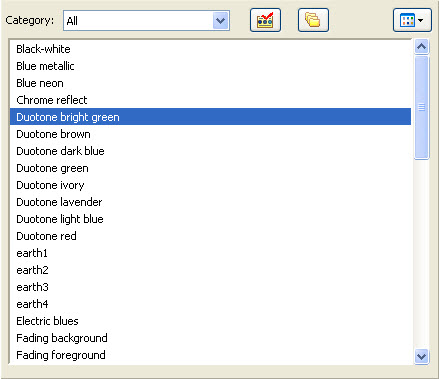
You can find your materials here. Supplies: Filter Unplugged tools, here Preparation : Take the arrow to know where you are in the tutorial. 1. File, New image, 900 x 600 pixels, transparent 2. Choose the gradient Duotone bright green (Corel_06_003) from your gradient list
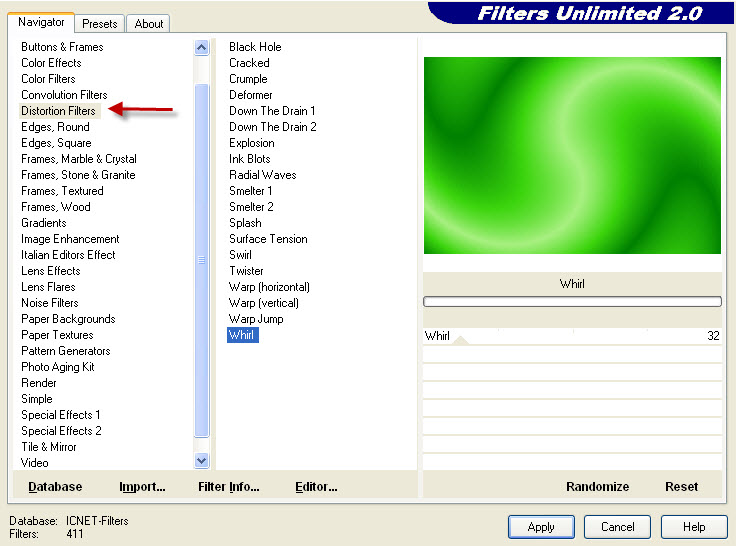
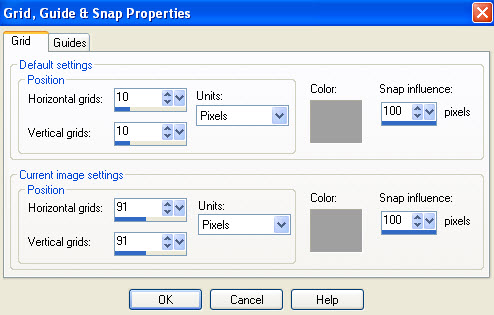
4. Effecten, Plugins, Filter Unlimited 2.0, Distortion Filters, Whirl 5. SHIFT + D to make a copy of the image and put it aside. 6. Put the foreground color to red (FF0000) and the background color to black 7. Layers, New raster layer 8. Draw a random rectangle 9. Change the settings in your tool options palette as follows 10. Duplicate this layer 2 times Rename these layers Square 1, Square 2 and Square 3 11. View, Grid 12. View, Change Grid, Guide & Snap Properties as follows 13. Select Square 3 in your layer palette: Pick Tool (K), put in your Tool Options Palette position X to 182
14. Select Square 2 in your layer palette: Pick Tool (K), put in your Tool Options Palette position Y to 0 This is what you should have by now:
15. Select the upper layer in your layer palette 16. Layers, New Raster layer 17. Switch foreground and background color 18. Again, draw a random rectangle 19. Change in your Tool Options Palette the settings as follows:
20. Duplicate this layer twice 21. Select in your layer palette the first copy 22. Pick Tool (K), put in your Tool Options Palette position X to 550
23. Select the second copy: Pick Tool (K), put in your Tool Options Palette position X to 641 24. Layers, Merge, Merge Down 25. Repeat Layers, Merge, Merge Down 26. Layers, Duplicate 27. Pick Tool (K), put in your Tool Options Palette position Y to 369 28. Layers, Duplicate 29. Pick Tool (K), put in your Tool Options Palette position Y to 459 30. Layers, Merge, Merge Down 31. Repeat Layers, Merge, Merge Down 32. Duplicate this layer twice Rename these layers Color 1, Color 2 and Color 3 33. Select Color 3 in your Layer Palette: Pick Tool (K), put in your Tool Options Palette position X to 186 34. Select Color 2 in your Layer Palette: Pick Tool (K), put in your Tool Options Palette position Y op 4 This is what you should have by now: 35. As we want to make a Rubik's Cube, we'll colorize (layer by layer and color by color ! ) the squares. Magic Wand tool as follows:
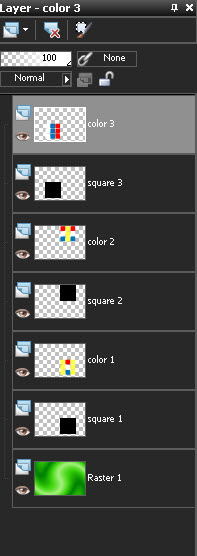
Flood fill With the color of your choice as follows I used these colors: Yellow: #ffff3f, Bleu: #0175bb, White: #ffffff 36. In your layer palette, move the colored layers just above the corresponding layer with the black square Your layer palette looks like this:
37. Merge each color layer with its black square layer (Layers, Merge, Merge down) 38. View, Change Grid, Guide & Snap Properties as follows
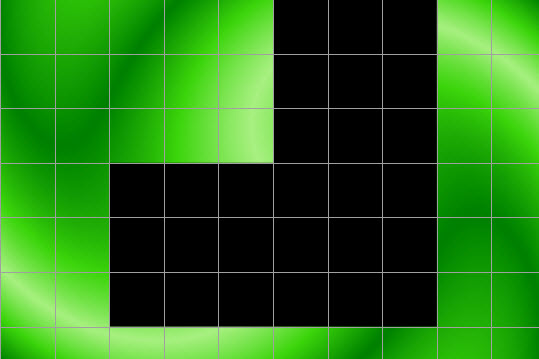
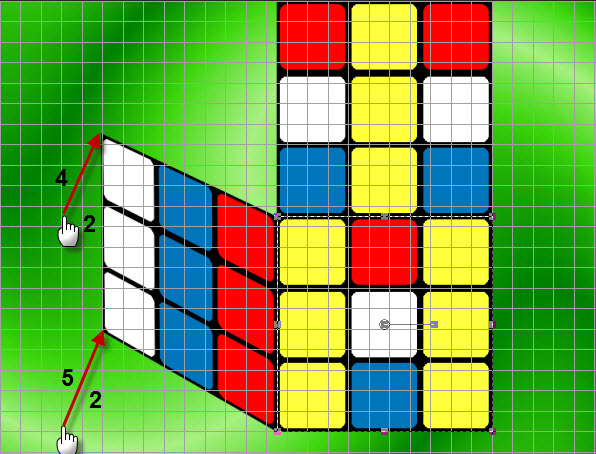
39. Pick Tool (K), Modus, Free and select Square 3 in your layer palette 40. Move the left bottom corner 2 blocks to the right and 5 blocks up 41. Move the left upper corner 2 blocks to the right and 4 blocks up
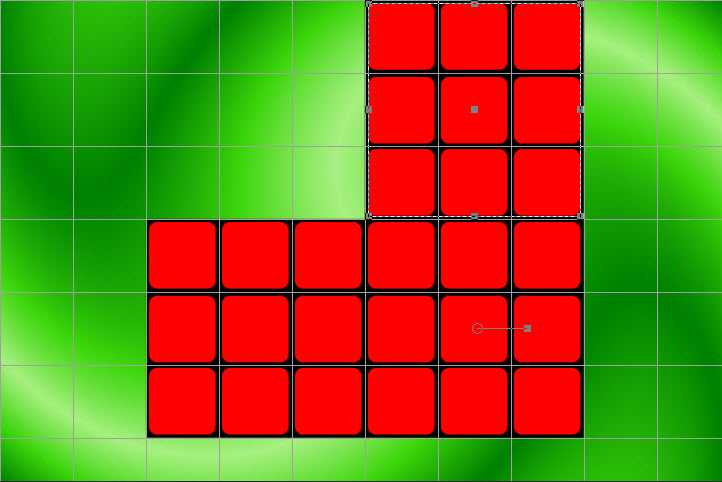
42. In your layer palette select Square 1 43. Move the right bottom corner 2 blocks to the left and 5 blocks up 44. Move the right upper corner 2 blocks to the left and 4 blocks up 45. In your layer palette select Square 2 46. Put the right bottom corner and the left upper corner at the right position (zoom so you can work properly and let these corners connect to the other ones) This is what you should have by now:
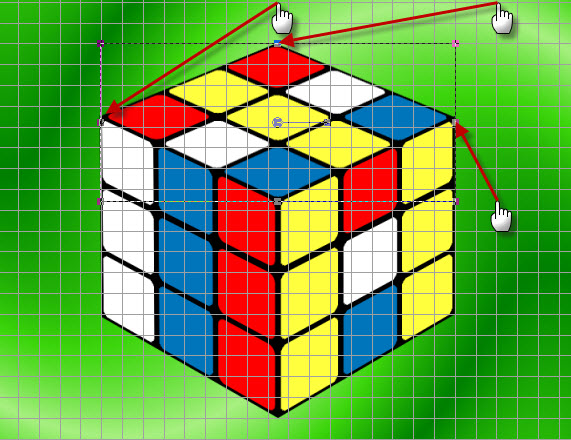
47. Move the right top corner 3 blocks down and drag it to the middle of your cube
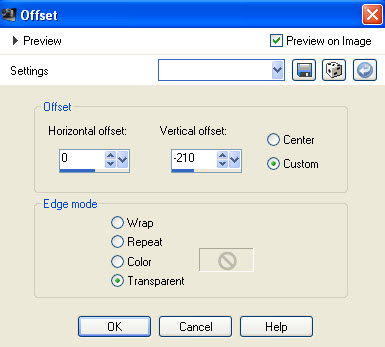
48. Match the bottom corner with the rest of your cube 49. Remove the grid as we don't need it anymore: View, Grid 50. In your layer palette, select square 3 and merge the layers of your cube: Layers, Merge, Merge Down repeat Layers, Merge, Merge Down 51. Image, Resize 80 %, All layers not checked 52. Effects, Image Effects, offset as follows
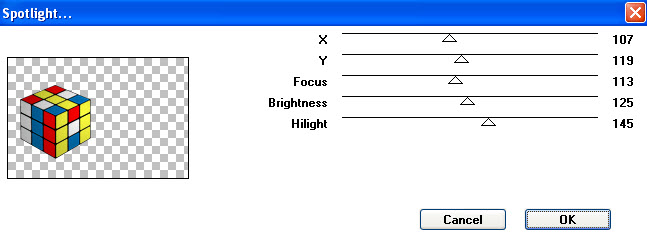
53. Rename this Layer Cube 1 54. Layers, Duplicate en rename this layer Cube 2 55. Duplicate the Layer once again and rename this layer Cube 3 56. Effects, Edge Effects, Enhance 57. Effects, Plugins, Unplugged Tools, Spotlight, as follows
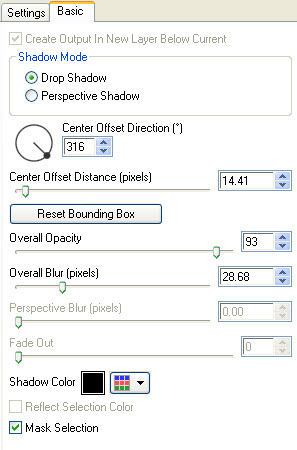
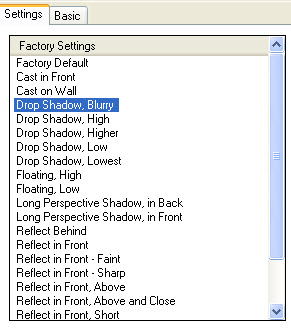
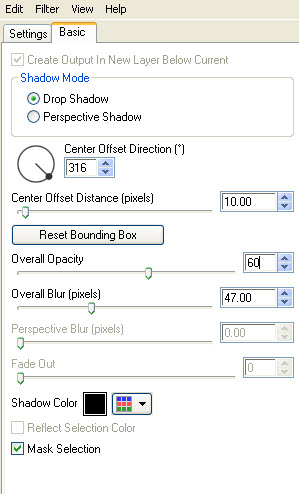
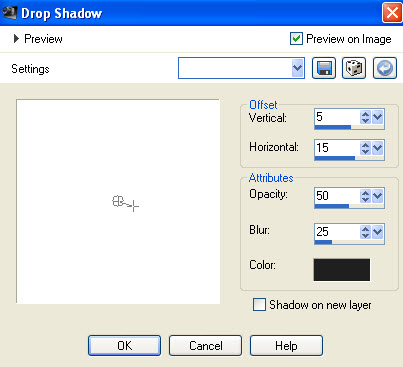
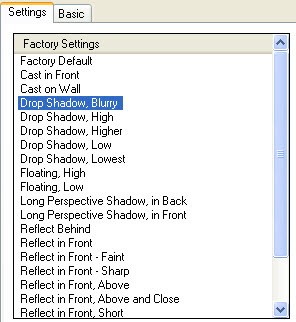
58. In your layer palette, select Cube 2 59. Effects, Plugins, Eye Candy 5, Impact, Perspective Shadow, Drop Shadow Blurry, Basic as follows:
60. In your layer palette, select Cube 1 61. Image, Flip 62. Effects, Image Effects, Offset with these settings
63. Layers, Load/Save Mask, Load Mask From Disk and find your masker NVfadingmask1 with settings: Source Luminance, Fit to canvas, Hide all mask 64. Layers, Merge, Merge group 65. Select the background layer 66. Selections, Load/Save Selection, Load Selection from disk 67. Find the selection NVCube001
68. Effects, Plugins, L en K landksiteofwonders, L en K’s Mayra with these settings
69. Selections, Load/Save Selection, Load Selection from disk 70. Find the selection NVCube002 71. Effects, Plugins, DSB Flux, Mosaic ripple as follows
72. Adjust, Blur, Gaussian Blur 4 73. Selections, Select None 74. Open the tube Chrismist_Armor-1024 75. Image, Resize 125% 76. Copy and paste as new layer 77. Effects, Image Effects, Offset, Horizontal -100, Vertical 35 78. Reduce the opacity to 40%, Blend Mode Luminance 79. Layers, New Raster Layer 80. Switch the foreground color back to your gradient 81. Load the brush dream_design_by_ghost_fight3r_3 and put it as shown on the example (reduce your worksheet to view the whole brush), size 760.
82. Layers, New Raster Layer 83. Take the brush GlamurGrl_conversion_blocked_set1_tippy001 and put it as shown on the example (reduce your worksheet to view the whole brush), size 850
84. Effects, 3d-Effects, Drop Shadow as follows
85. Open the tube ke_bonita_bicharita_por_barullo 86. Image, Resize 85% 87. Copy and paste as new layer 88. Effects, Image Effects, Offset, Horizontal 180, Vertical 0 89. Effects, Plugins, Eye Candy 5, Impact, Perspective Shadow, Drop Shadow Blurry, Basic as follows
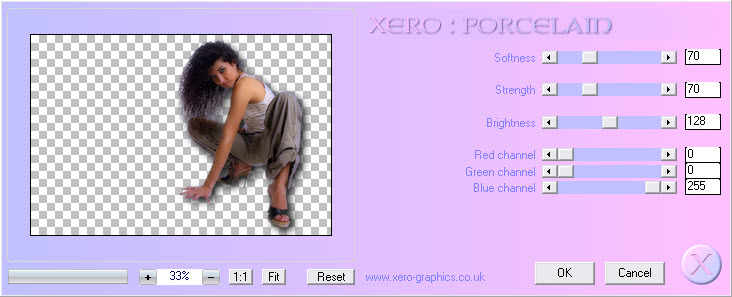
90. Effects, Plugins, Xero Porcelain, with these settings
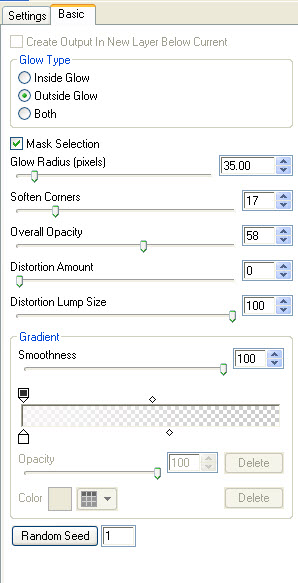
91. Lock your foreground color, Background color #c3f92b 92. Activate the text tool and choose the font JohnLennon, size 120 pixels and type “the” 93. Image, Free Rotate, Left, 90° 94. Choose the font Pointed, size 170 pixels and type “Cube” 95. Move the text to the right place and merge both text layers 96. Effects, 3D-effects, Drop Shadow, 2 2 100 15 97. Layers, Merge, Merge All 98. Image, Resize 85% 99. Copy and paste as new layer on the background from step 5 100. Effects, Plugins, Alien Skin Eye Candy 5, Impact, Gradient glow, outside glow, Basic as follows
101. In your layer palette, select the background layer 102. Effects, Plugins, Xero Fritillary
103. Don't forget your signature and save as JPG.
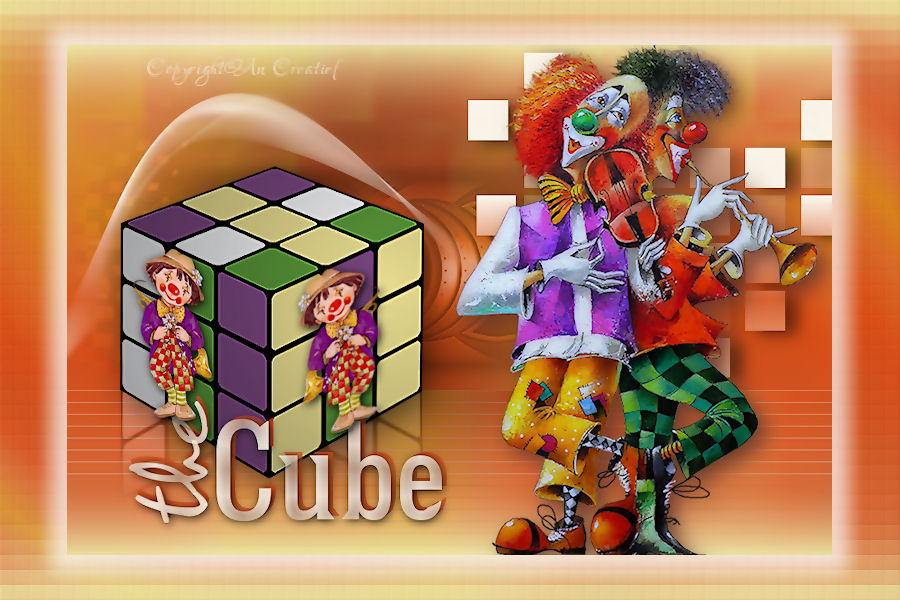
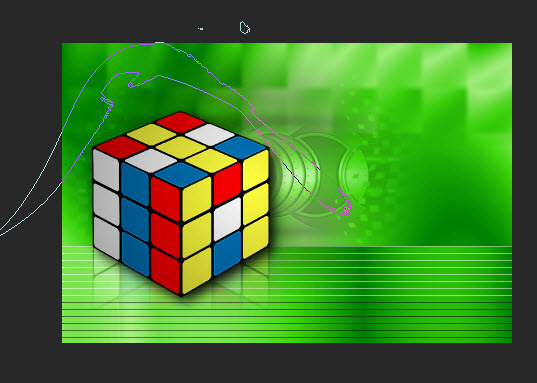
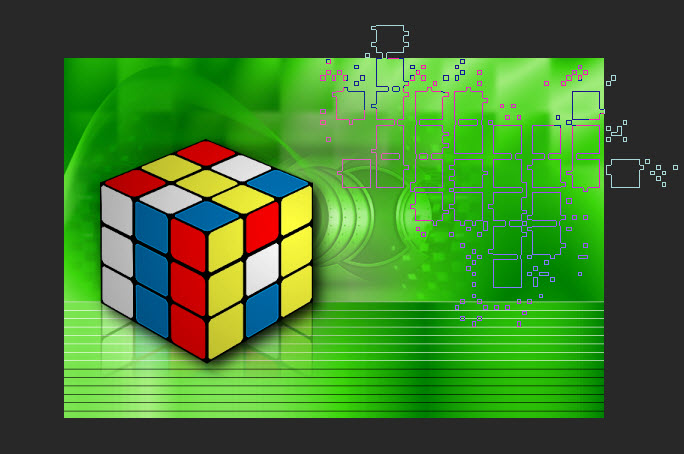
This is an extra example made by An Creatief
Lesson The Cube was written on April 22, 2010
This site is © Copyright Nancyspspdesign.be 2007-2010, All Rights Reserved |
|
| ar |

 .
. 


 .
. 
 .
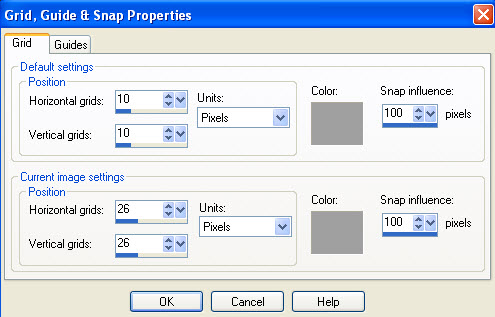
.